Amazon Cloudfront S3 Headless CMS
Setup headless cms and deploy on AWS CloudFront and S3.
S3 Deployment
YouDoCMS is integrated with the AWS CLI. This synchronises your local build folder with your S3 bucket. Build a whole site or a single page and deploy in seconds with a single click.
CloudFront
Setup CloudFront distribution, cache invalidation, SSL certificates and image metadata for maximum performance on desktop and mobile. Create 301 redirect rules for updated content.
IAM and Route 53
Simplify your deployment with AWS Route 53 integration to update site DNS settings for your domain and SSL certificate validation.
Deploying a Static Site to S3?
Creating, building and deploying a Jamstack site manually to S3 and CloudFront is straight forward enough. What about updating and maintaining!
A static site generator such as Hugo is a fast and simple way to build a static site once you have got your head around the syntax. However what happens when you make some changes such as adding an additional menu and a new page to a blog. The entire site will need to be rebuilt, manually uploaded to S3 and manually invalidating the CloudFront cache. A headless CMS such as YouDoCMS automates this process.
Furthermore if you delete content CloudFront will continue to serve the pages until the cache is cleared or it will return a 404 error. S3 allows up to 40 301 redirects free of charge which YouDoCMS can create automatically when you update your content.
Lastly to optimise your page performance on mobile devices images should have the correct meta data settings. This can be done manually for each image but if you have many of them it's a slow process. YouDoCMS automatically updates the meta data when you deploy the site.
Static vs Headless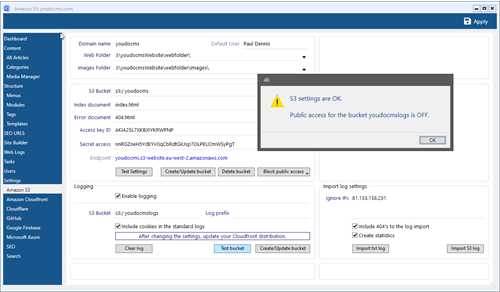
AWS S3 Static Site
AWS hosting consists of two products. CloudFront is the CDN and S3 is the storage. CloudFront is part of AWS always free option whereas S3 storage has a 12 month free period. However ongoing storage charges are very low.
- CloudFront distribution.
- Route 53 and SSL.
- Web Server Logs.
- S3 bucket.
AWS CloudFront API.
Build and deploy a static site to AWS CloudFront and S3. YouDoCMS headless CMS is integrated with AWS CloudFront and S3 for quick and easy set up for static hosting.
Create Your Account
We support the full range of AWS services to enable you to create a domain, configure dns and host your static site.
Create IAM User
Required. Create a new user in Identity Management.
Install AWS Packages
The Amazon Web Services API is accessed through the node AWS packages.
How We Do It?
We make your setting up AWS stress-free for you to have the perfect control.
AWS S3
Setup and enable an AWS S3 storage bucket and synchronise the contents of your website to the cloud. When you upload, only changed files are uploaded keeping upload times to a minimum.
Certificate Manager SSL
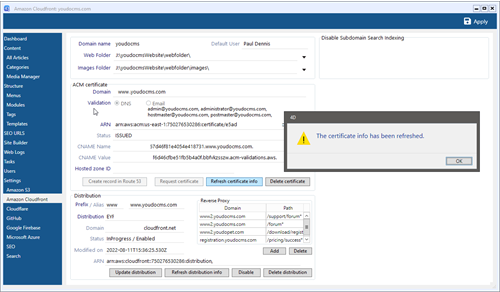
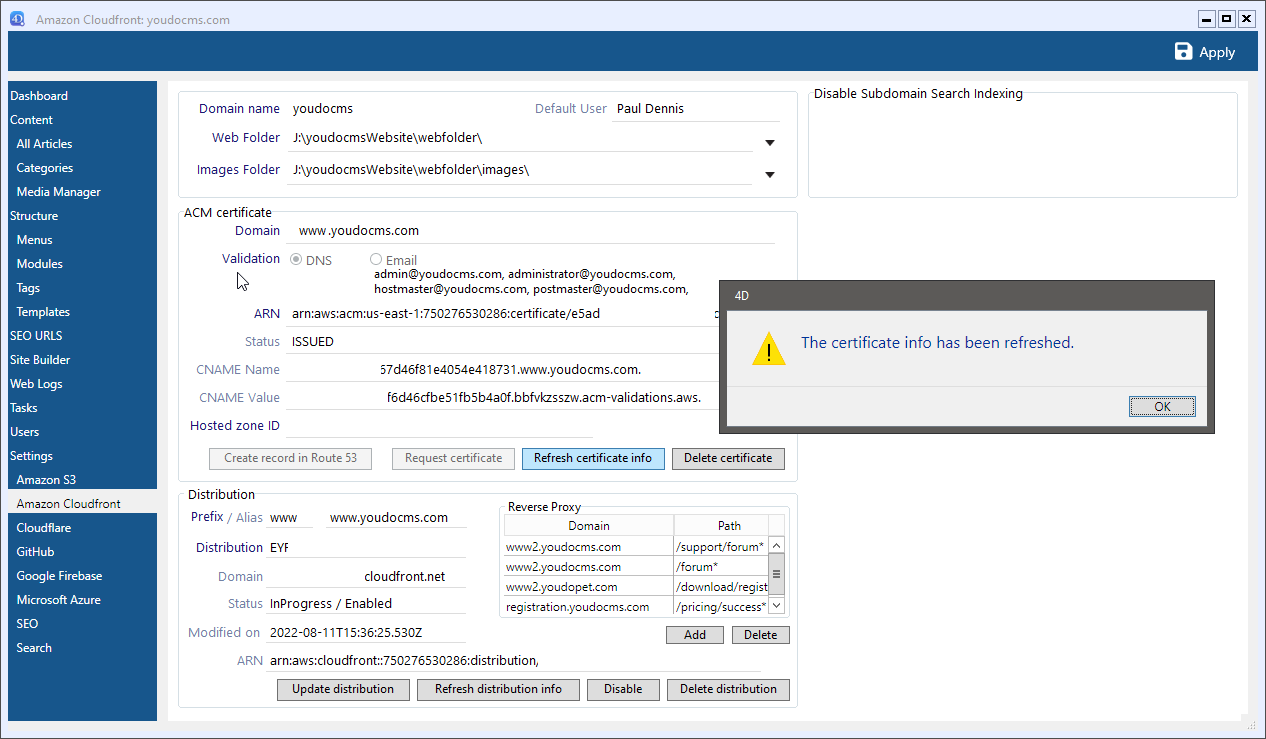
Create a free SSL to use with your website and attach this to the CloudFront distribution.
Route53 DNS
Using route 53 for DNS is optional. However if you are a route 53 user and your domain name is registered with Amazon then you can update the DNS settings when you create your CloudFront distribution.
CloudFront
The CloudFront content delivery network is the key component that makes static sites so fast. Automatically create a CloudFront distribution and link it to your S3 bucket to host your static site. CloudFront origin cache validation every time you deploy.
There's More
Clear the Cache!
CloudFront uses S3 bucket storage which has many benefits. When you update your site and synchronise your local data to the cloud our application automatically requests CloudFront to clear the cache ensuring only the latest pages are available.
YouDoCMS automates the process to synchronise and deploy your website to the CloudFront CDN.
1. Upload
Deploy with the AWS CLI to synchronise your files with your S3 bucket.
2. Validate
Validate the deployment for CloudFront to create a new object in the cache.
3. Clear
Clear the previous deployment to update your site.
Reverse Proxy.
Create AWS Reverse Proxy
Update DNS to point to your target sub-domain.
Add URL Path
Add path for your proxy target. Multiple paths can be used.
Update Distribution
Clear the cache and update CloudFront to proxy the requests.
How It Works?
Static sites do not meet every requirement and if your site has a shopping cart or a community forum requiring users to login, a reverse proxy is the easiest way to manage this.
A CloudFront reverse proxy can serve the majority of your site via the CDN thus achieving a high Google ranking and redirect specific URLs to a forum or shopping cart.
Our community forum uses the Xenforo platform running behind a CloudFront reverse proxy.
Learn More